After a break for the holidays I’m back to work on my project. The next step is installing the USB controller ports.
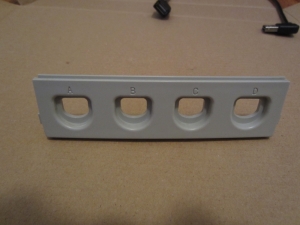
I mentioned earlier that I’m trying to keep the Dreamcast case as natural looking as possible. With the power and HDMI inputs I feel I was able to pull this off well. On the power side I was able to use the existing AC cord jack and mod it from the inside to connect it to my USB hub. For the HDMI port I was able to use an existing port in the back of the case to install a panel mount HDMI cable. I’d like to go the same direction with the USB ports by fixing them to the inside of the controller port panel.
If I can pull this off right it will really help to make the emulator feel like a legitimate video game console. I’ll be able to plug in my controllers by inserting them into the case’s original controller ports.
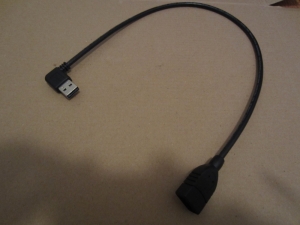
Before I get started on this though I had to find the right USB cables. Since I am ordering them online and am unable to see them in person I decided to start by purchasing just one cable to make sure the brand/model I ordered would work for me. The USB hub I am using already takes up quite a lot of space in the case. In order to cut down on the extra space taken up by the cords running into it I purchased a right angle USB cable.
My initial plan was to cut back the rubber guard from the female end of the cable and expose the metal area surrounding the USB jack. I would then insert the exposed jack through the controller port. As part of this plan I would have to widen the controller port horizontally in order to fit the jack into the port. I went on and cut back the rubber guard on the cable. Before installing it grabbed a couple of USB cords and tried plugging them into the jack through the controller port just to see how close to the front of the panel the jack would need to sit. When I did this I realized that I had enough slack to leave the jack on the inner side of the panel. I didn’t actually need to widen the port and install the jack inside of it. I was happy with that outcome. I ruined a USB cable in the process but found out that I did not need to do any case modifications for this step. This would be another way I would be able to preserve the original look of the case.
I was happy with the type of USB cable I found so I ordered four more like it (one for each controller port). Before installing the cables I needed to make sure that everything would fit into the case. When I first purchased the Dreamcast case it seemed like I had more than enough space. However, after buying all the parts and trying different ways of inserting them into the case I quickly realized that space was going to be a very precious commodity. Unfortunately after plugging all four controllers into the hub I found that I just didn’t have enough room for all of them. I was going to have to cut it back to two. By using two cables I would be able to use only the USB ports on one side of the hub which would allow me to put the other side flush against the back wall of the case. Without doing this I simply wouldn’t have enough room for the other elements. The good thing is that this isn’t too big a loss. I seriously doubt I’ll be using any more than two controllers anyway. It is a shame to not use all four controller ports though…
For my second installation attempt I decided to cut the cable’s rubber guard back and make it flush with the front of the USB jack.
Next I would need to attach the cable to the back of the panel. I found that the controller port panel was made of ABS plastic. I did some research on how to glue a non-ABS material to ABS but didn’t find anything other than suggestions to use super glue. I decided I’d give it a try. Fortunately it seems to have worked. I attached just one to start off with. It seemed solid enough even when plugging and unplugging USB cables into it so I went on and attached the second one.

This step took some trial and error but I think it came out well in the end. The final step will be inserting all of the elements in the case and fixing them into place.


Kevin,
The Superglue will almost certainly crack and fail at some point. It is too brittle to tolerate any torque from handling the cords. Use the superglue to achieve the initial stabilization, and reinforce the attachment with hot melt glue. If you can rough up the surfaces where it won’t show, that would be ideal. The hot melt glue can be removed pretty easily, and is flexible enough to add security to the connection.
LikeLike
Thanks for the info. I’ll do that.
Do you think I should do the same thing with the internal elements that won’t be seeing so much pressure? For example: I’m planning on glueing the Pi’s mounting standoffs to the plate at the bottom of the case. Would super glue be sufficient for this?
LikeLike